SC2023 reproducibility materials
In accordance with the reproducibility initiative, this document aims at helping members of the reproducibility committee to locally reproduce single-GPU experiments presented in our SC2023 paper.
The SC2023 repository contains all the files that were used for the experiments presented in the associated paper, from the config files to the plot generation. These experiments were run on Jean-Zay (ranked 124 of the Top500 list). The current repository also provides the necessary files to reproduce the experiments at a smaller scaler on a personal computer for instance. To this end: - the original mesh size of 1,000,000 elements (1000x1000) is scaled down to 10,000 elements (100x100), - the training dataset contains 100 simulations instead of 250.
This way, access to moderate resources only (i.e. any local laptop with multiple cores and one GPU) should be sufficient to reproduce the experiments.
Note
All scripts used hereafter as well as for the paper experiments are described here.
The next sections will guide the reader step by step:
- SC2023 reproducibility materials
- Build
- Running the Offline vs Online experiment
- Post-processing
- Reproducing the exact figures from the paper
Build
Building Melissa
Melissa is a framework designed to run on supercomputers with common batch scheduler such as slurm or OAR. For local execution, Melissa relies on OpenMPI and the scheduling is left to the launcher. Installation guidelines are detailed on the documentation and are recalled below:
The user can first create a melissa folder by cloning it from its Inria GitLab repository and changing its target branch:
The following dependencies must be installed before building Melissa:
- CMake 3.7.2 or newer
- GNU Make
- A C99 compiler
- An MPI implementation
- Python 3.8 or newer
- ZeroMQ 4.1.5 or newer
On debian based systems, these dependencies can be installed via:
All additional Python dependencies (see requirements.txt and requirements_deep_learning.txt) will be installed automatically with pip at build:
mkdir build install && cd build
cmake -DNATIVE_PIP_INSTALL=OFF -DCMAKE_INSTALL_PREFIX=../install ..
make
make install
Next, create a virtual environment:
# from melissa/build
cd ..
python3 -m venv .venv
source .venv/bin/activate
python3 -m pip install --upgrade pip
pip3 install -r requirements.txt -r requirements_deep_learning.txt -r requirements_dev.txt
pip3 install -e .
Users can then source the environment file:
and execute the following commands: to confirm the successful installation.The purpose of this local experiment is to compare online/offline training with Melissa for one epoch and with different buffer implementations.
Note
Here a simulation means a full trajectory of 100 time steps resulting from one set of inputs.
Building heat-pde executables
This step takes care of generating the training and validation datasets composed of respectively 100 and 10 simulations. In order to generate such datasets, the user can move to the heat-pde executable folder:
and build the necessary executables:
This should produce 3 executables in the build directory:
heatf, the Fortran90 version of the solver instrumented with Melissa API,heatc, the C version of the solver instrumented with Melissa API,heat_no_melissac, a C version of the non-instrumented solver.
Note
Only the C executables will be used to respectively generate online and offline data.
Clone this experimental repository
Next, clone this repo to obtain all the SC2023 specific experimental configuration files and plotting scripts:
Running the Offline vs Online experiment
The user can now move to the offline directory:
A simplified Melissa server will be used twice to produce the local datasets with config_offline_mpi.json. To this end, the user will first need to specify the config executable path:
"client_config": {
        "executable_command": "/path/to/melissa/examples/heat-pde/executables/build/heat_no_melissac",
    },
A dataset of 100 simulations can then be generated with the command below:
This last comment should print the following message:
$ melissa-launcher -c config_offline_mpi.json

$! ---------------------------------------------- $!
  __  __ ______ _      _____  _____ _____
 |  \/  |  ____| |    |_   _|/ ____/ ____|  /\
 | \  / | |__  | |      | | | (___| (___   /  \
 | |\/| |  __| | |      | |  \___ \\___ \ / /\ \
 | |  | | |____| |____ _| |_ ____) |___) / ____ \
 |_|  |_|______|______|_____|_____/_____/_/    \_\

$! ---------------------------------------------- $!

Access the terminal-based Melissa monitor by opening a new terminal and executing:

melissa-monitor --http_bind=0.0.0.0 --http_port=8888 --http_token=<some-token> --output_dir=/path/to/experiments/sc2023/heat-pde-dl/offline/TRAINING_OUT

All output for current run will be written to /path/to/experiments/sc2023/heat-pde-dl/offline/TRAINING_OUT
Thus, by opening a second terminal, the user should be able to follow the progress of the data generation:
source /path/to/melissa/melissa_set_env.sh
melissa-monitor --http_bind=0.0.0.0 --http_port=8888 --http_token=<some-token> --output_dir=/path/to/experiments/sc2023/heat-pde-dl/offline/TRAINING_OUT
Note
The job_limit is set to 3 so that in addition to the server, only 2 clients can be executed at the same time. Depending on the resources available, this number can be increased or decreased to any more suitable value.
In heat-pde-dl/offline, this first execution should yield a TRAINING_OUT folder containing result sub-folders Res_X (X going from 0 to 99), each containing one file per simulated time steps: solution_Y.dat (Y going from 0 to 99).
By modifying the output_dir entry, setting parameter_sweep_size to 10 and changing the seed value:
{
    "output_dir": "VALIDATION_OUT",
    "study_options": {
        // parameter_sweep_size is the number of clients (i.e. simulations) to execute
        "parameter_sweep_size": 10,
        ...
        "seed": 1234,
    },
}
The same command can be used to generate the validation results:
Since manipulating .dat files is not very effective, a script is used to convert them into binary numpy files:
# from ~/experiments/sc2023/heat-pde-dl/offline
python3 process_dataset.py TRAINING_OUT 100 100 --process --create_folder
python3 process_dataset.py VALIDATION_OUT 100 100 --process --create_folder
This will create two folders inside the heat-pde-dl/offline directory:
- sc2023-heatpde-training with 100 Res_X folders each containing one data_X.npz file.
- sc2023-heatpde-validation with input_10.npy and validation_10.npy files in addition to Res_X folders each containing one data_X.npz file.
Offline training
Similarly to the paper experiments, the offline training will read both training and validation datasets from files while the validation dataset will be loaded in memory for the online training.
Such offline trainings can be performed with the following commands:
# from ~/experiments/sc2023/heat-pde-dl/offline
python3 run_offline_study.py --train=True --ntrain_sims=100 --nval_sims=10 --out_dir=OFFLINE_OUT --data_dir=$PWD --frequency=100
Note
When the validation loss computation frequency is too low, the offline throughput measurements are biased. This comes from the fact that computing the validation loss gives unaccounted time to workers to pre-load the next batches of data hence artificially increasing the training throughput.
Online training
Now that the reference training has been performed, let us try online training.
First move to the example parent directory heat-pde-dl:
Modify config_mpi.json to indicate the right paths to the validation dataset and to the executable command:
{
    "dl_config": {
        "valid_data_path": "/path/to/experiments/sc203/heat-pde-dl/offline/sc2023-heatpde-validation/",
    },
    ...
    "client_config": {
        "executable_command": "/path/to/melissa/examples/heat-pde/executables/build/heatc",
    }
}
The study can now be launched with the following command:
The config file can easily be modified to assess the impact of the buffer strategy. For instance to test the FIRO buffer:
To test the Reservoir buffer:
Post-processing
If the previous steps were successful, the user should have four result folders in total:
1. heat-pde-dl/offline/OFFLINE_OUT,
2. heat-de-dl/FIFO_OUT,
3. heat-pde-dl/FIRO_OUT and
4. heat-pde-dl/RESERVOIR_OUT.
They all contain tensorboard logs that can be observed with the following commands:
# from ~/experiments/sc2023/heat-pde-dl
mkdir tb_logs
cp -r offline/OFFLINE_OUT/tb_* tb_logs/offline
cp -r FIFO_OUT/tensorboard/gpu_0 tb_logs/fifo
cp -r FIRO_OUT/tensorboard/gpu_0 tb_logs/firo
cp -r RESERVOIR_OUT/tensorboard/gpu_0 tb_logs/reservoir
tensorboard --logdir tb_logs
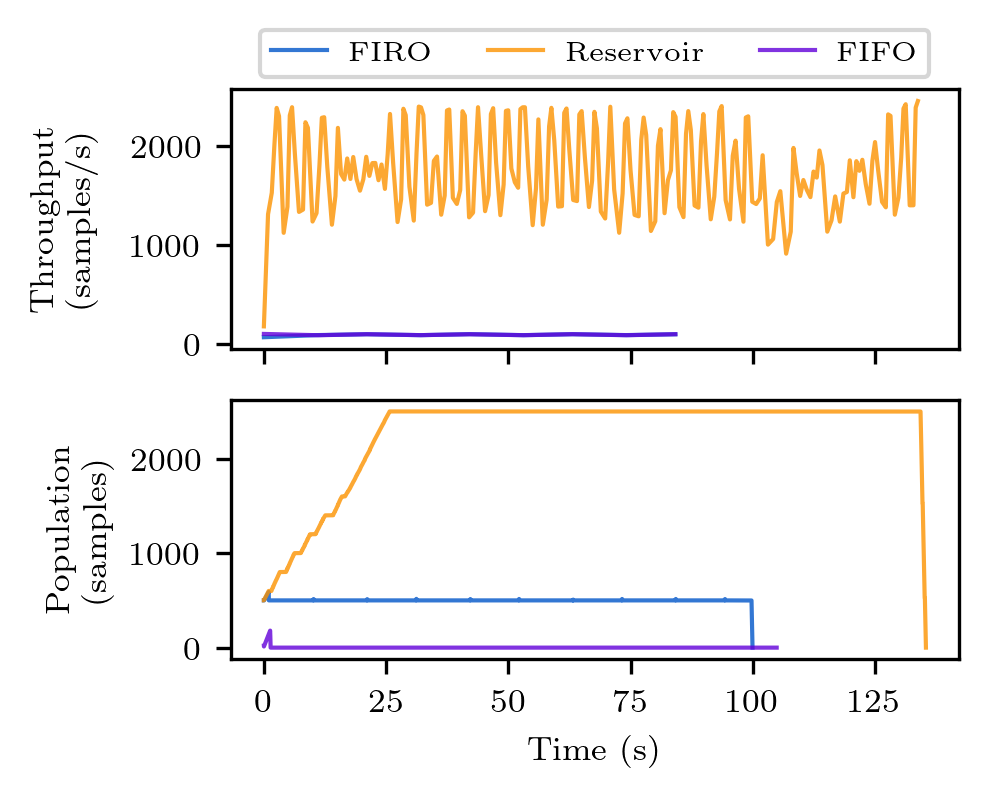
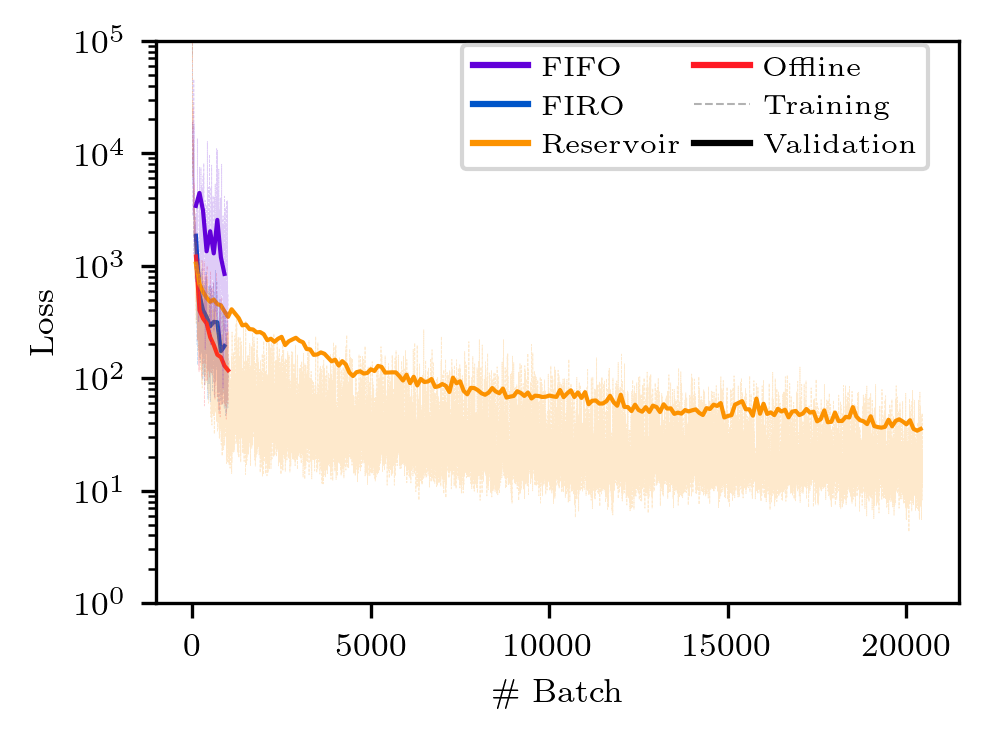
If the number of simultaneous clients was kept at 2 (i.e. job_limit=3), significant validation loss and throughput discrepancies should be observable between online and offline values.
To plot the results of your experiments, navigate to the plot directory and run the following commands:
# from ~/experiments/sc2023/heat-pde-dl
cd plot
# convert the tb logs to dataframes
python convert_to_df.py --root-dir ../tb_logs
# plot the train/validation loss
python plot_loss.py
# plot the throughput
python plot_throughput.py
The figures will be saved to the plot directory as png files. The figures should look like the ones below. Note however, there might be discrepancies due to the different execution time of the clients on different machines.
Reproducing the exact figures from the paper
The data generated from our large scale experiments are contained in the accompanied .zip file called sc2023_data.zip. To reproduce the figures from the paper, simply run the following commands:
# from ~/experiments/sc2023
unzip sc2023_data.zip
cd sc2023_data/src
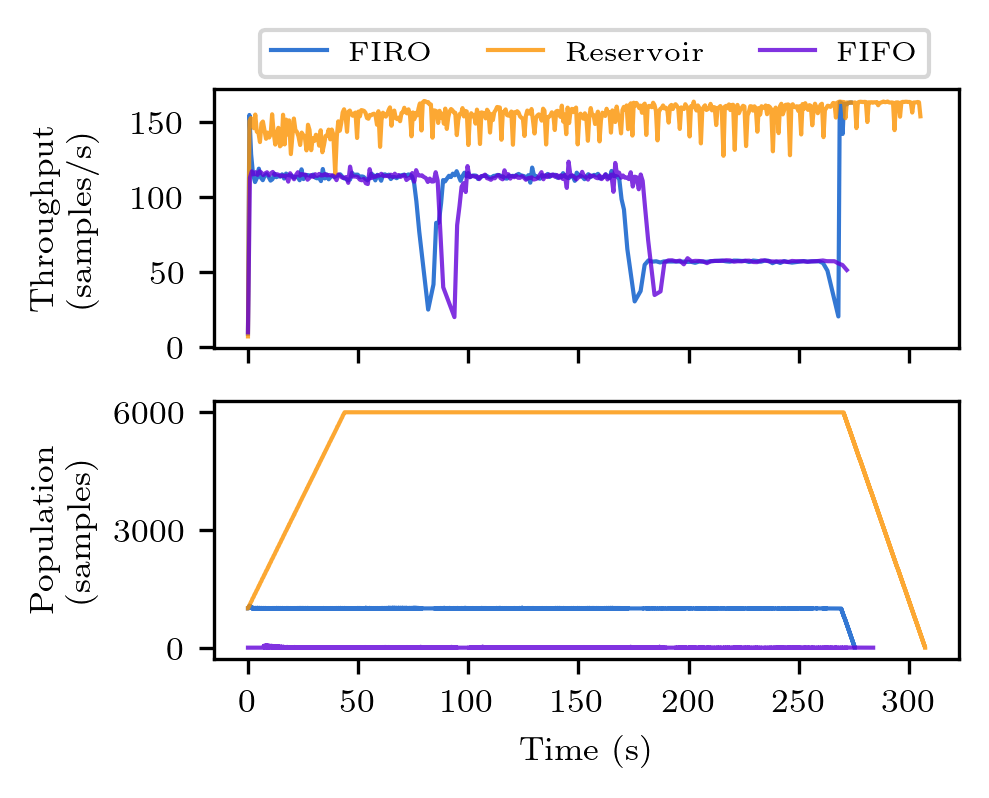
python3 Figure_2_throughput.py
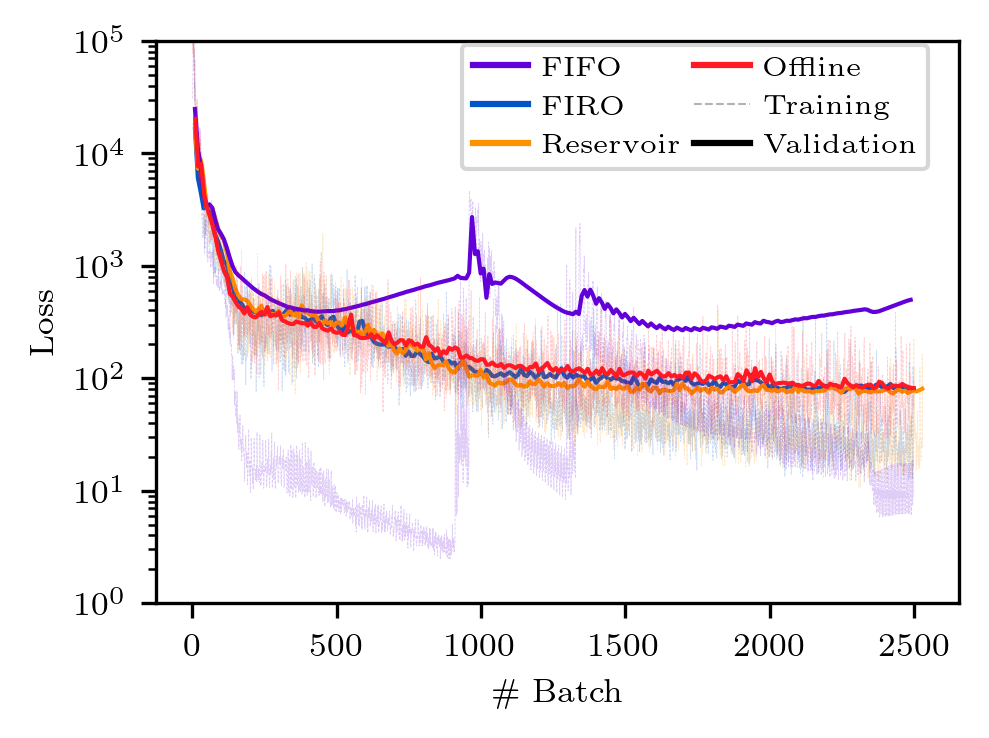
python3 Figure_4_loss.py
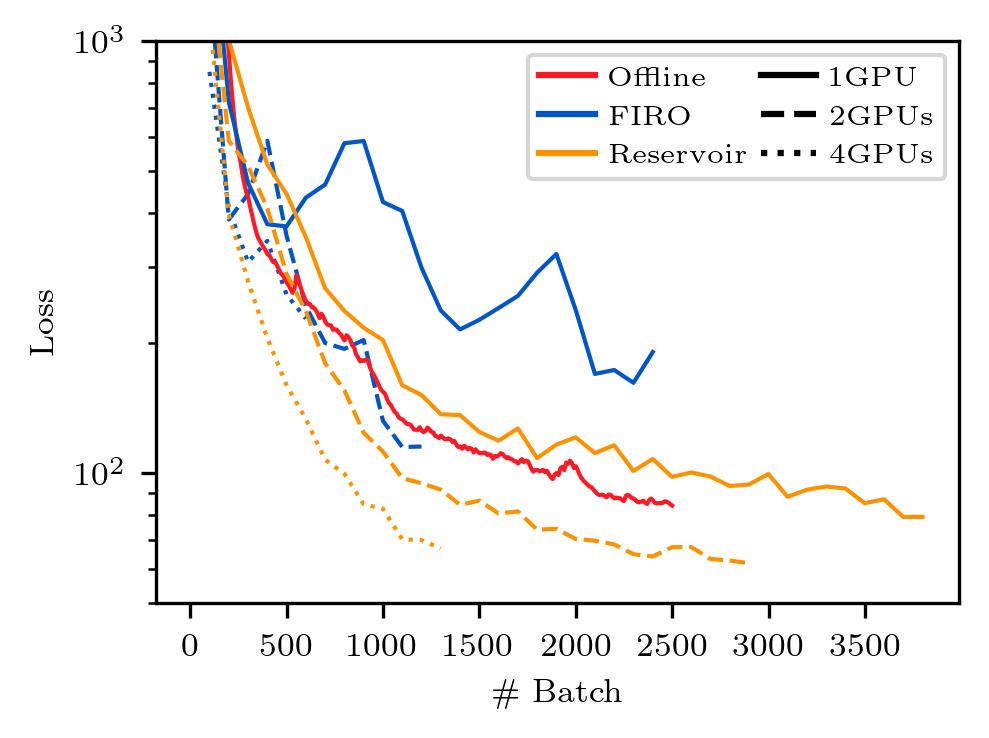
python3 Figure_5_multi_gpu.py
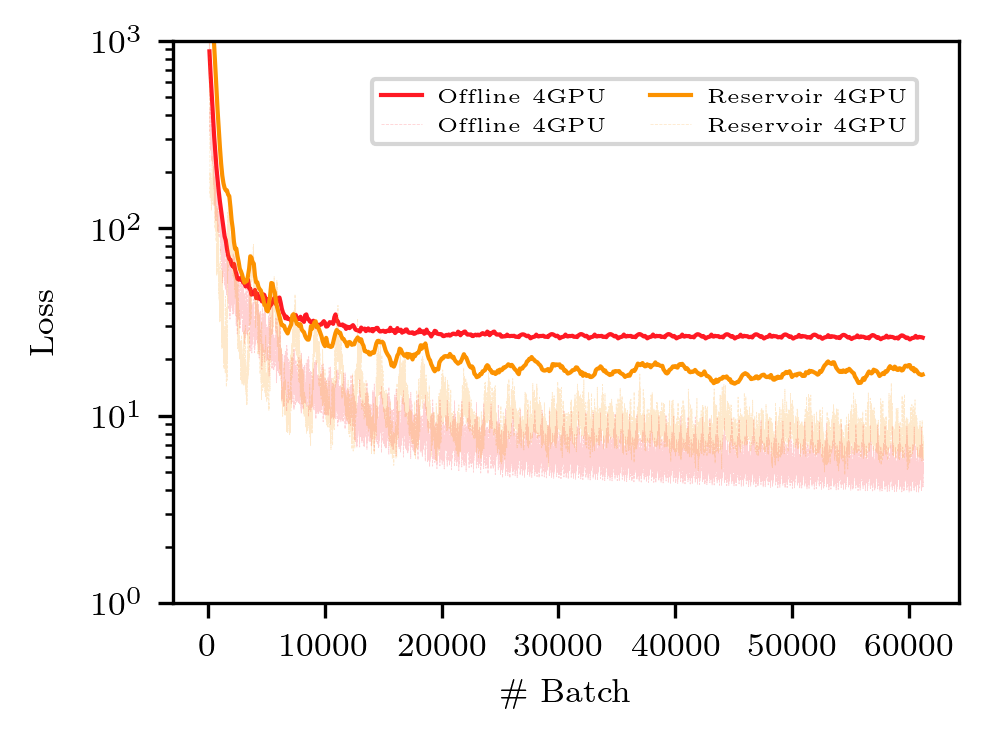
python3 Figure_6_largescale_onlineoffline.py
Which will generate each figure in the sc2023_data/figs directory.
These figures are displayed below are the ones presented in the article.
